
Table of Contents
This tutorial shows how to realize a dual PC audio setup using VoiceMeeter in a two PC streaming setup with no mixer! I explain how to set up VoiceMeeter to send audio from e.g. Discord over Ethernet from the streaming to the gaming PC and how to send your microphone over Ethernet from the gaming PC back to the streaming PC.
Prerequisites
- Two computers in the same local network
- Download and install VoiceMeeter on both machines
- Download and install Discord on your streaming PC
1. Enable VoiceMeeter output
Before we begin setting up our dual PC audio setup, make sure that Windows shows you VoiceMeeter as an input device. If this is not the case, enable it by:
- Right-click on speaker icon in the task bar
- Click on manage sound devices
- Enable the VoiceMeeter Input

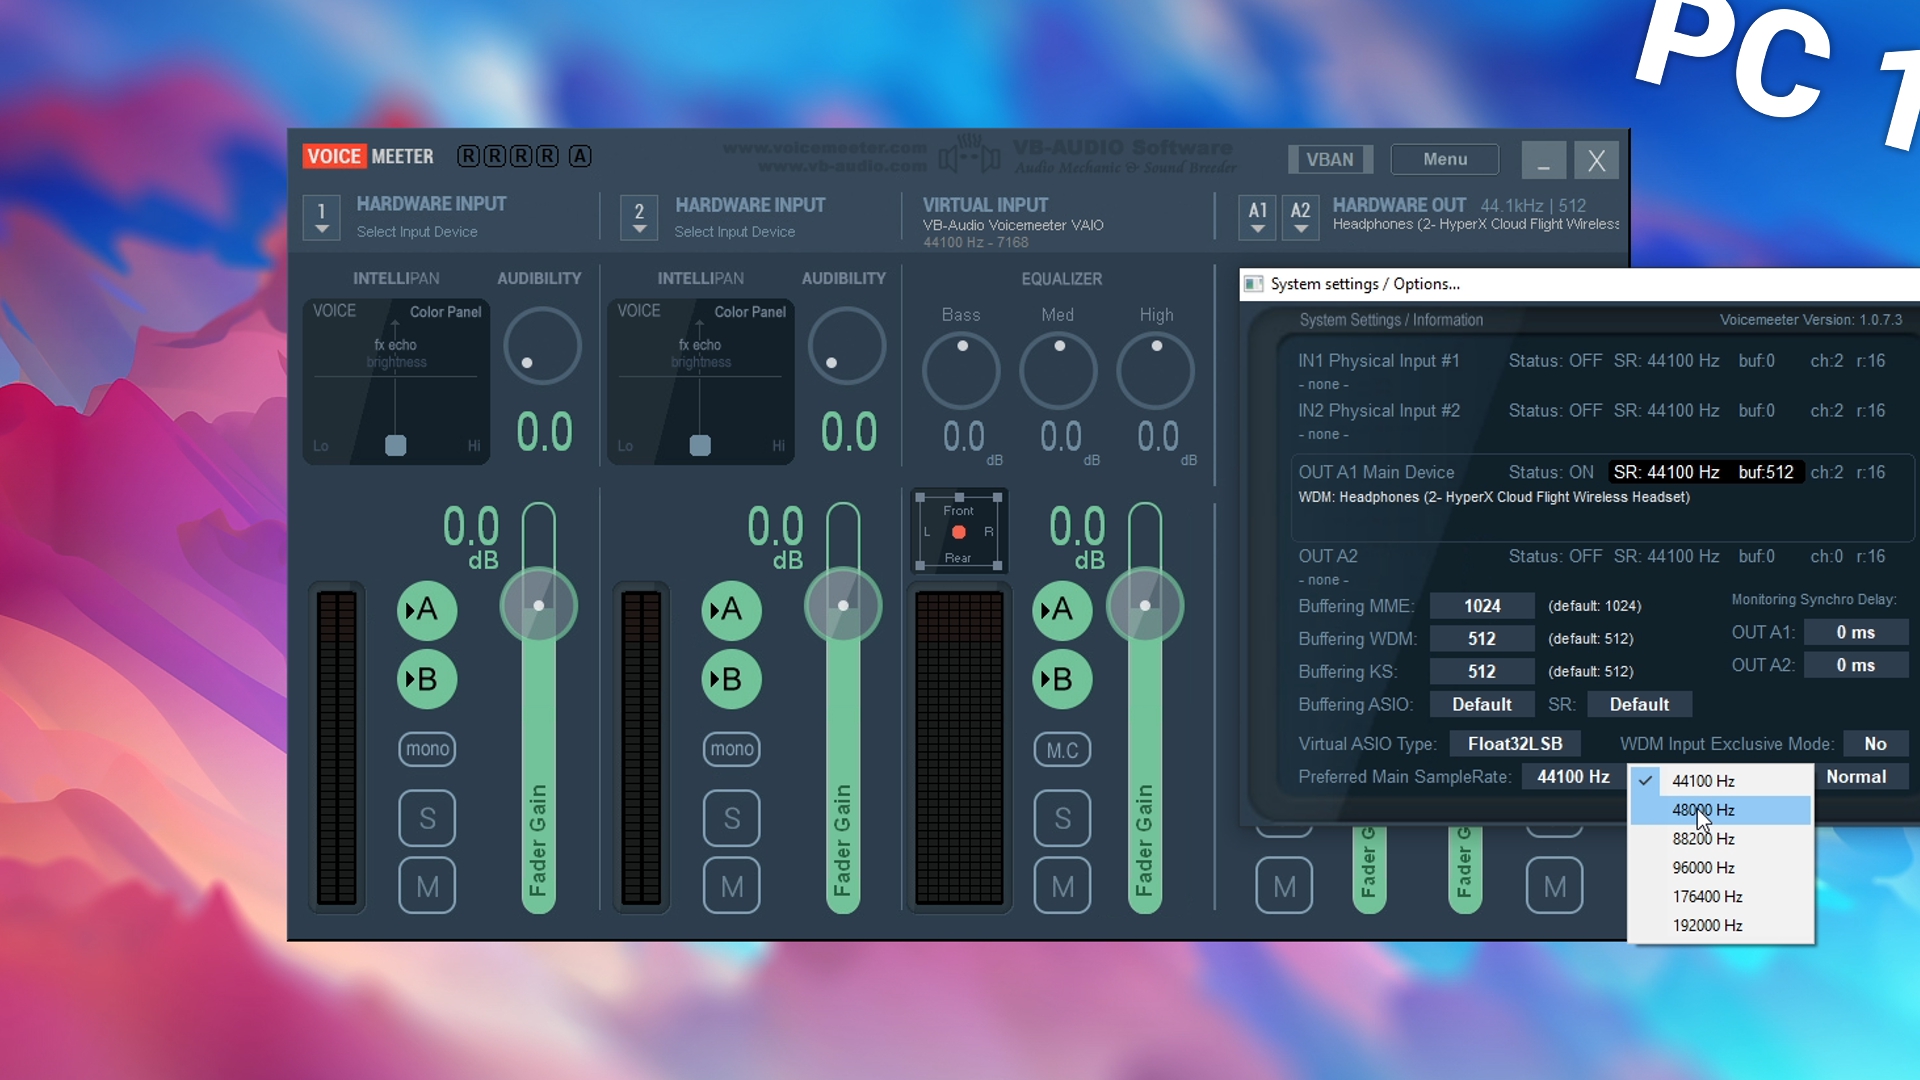
2. Set up output devices
On both machines, set up your default output device on VoiceMeter. Additionally, you should check the sample rate of your default playback device and match this setting in VoiceMeeter. For this:
- Right-click on speaker icon in the task bar
- Click on open sound settings
- Select your regular playback device as output device again
- Click on device properties
- Click on additional device properties
- Go to advanced
- Check your Default Format
- In VoiceMeeter, click on menu
- Click on system settings
- Set up the proper sample rater


3. Send audio from streaming to gaming PC
Next, we are going to set up a audio stream from the streaming to the gaming PC. This will transmit the audio from Discord back to our gaming PC:
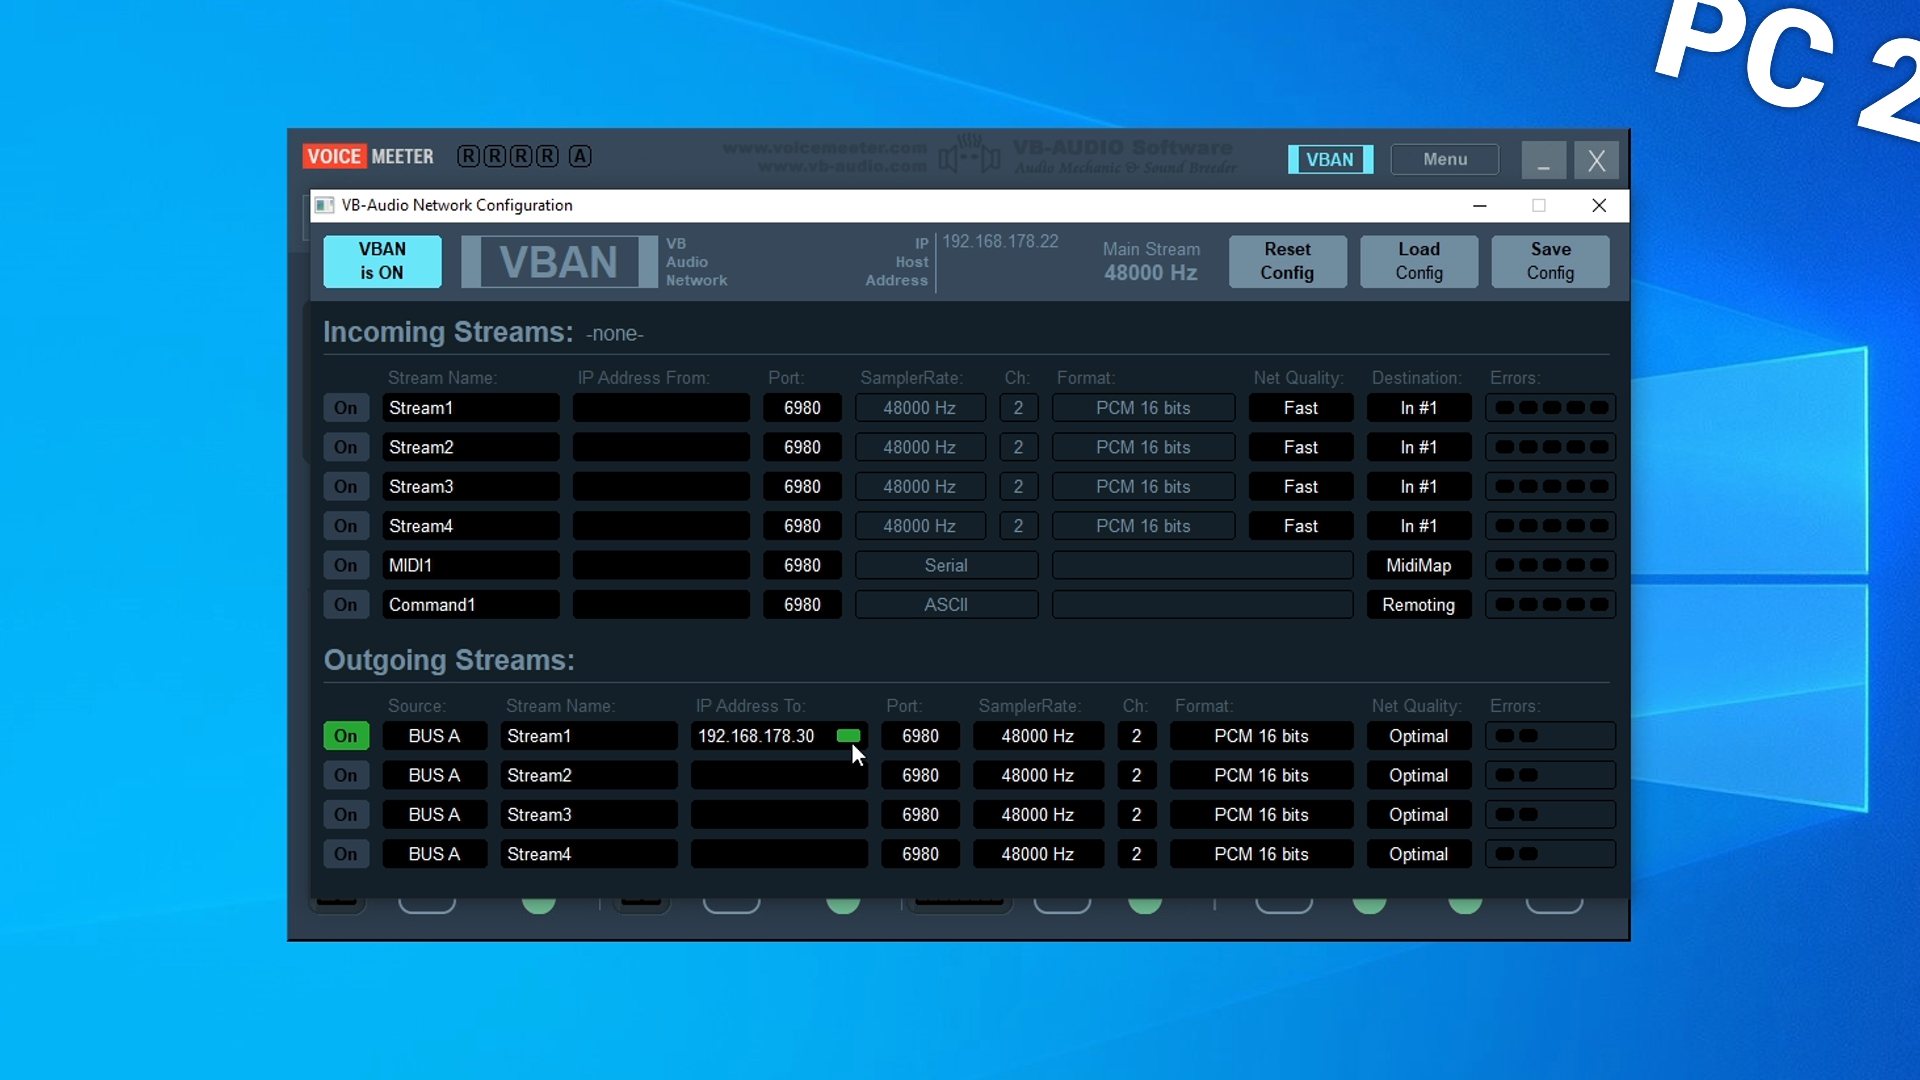
- Click on the VBAN button in VoiceMeeter on the streaming PC
- Toggle the VBAN is OFF button to enable VBAN
- Under outgoing streams, enable the first stream and put the local IP address of your gaming PC under the IP Address To field
- Note: You can find the local IP address on the top of the VBAN configuration window
- If you set up everything correctly, you should now get a green rectangle next to the IP address (see first screenshot)
- Make sure to select VoiceMeeter Input as playback device on the streaming PC
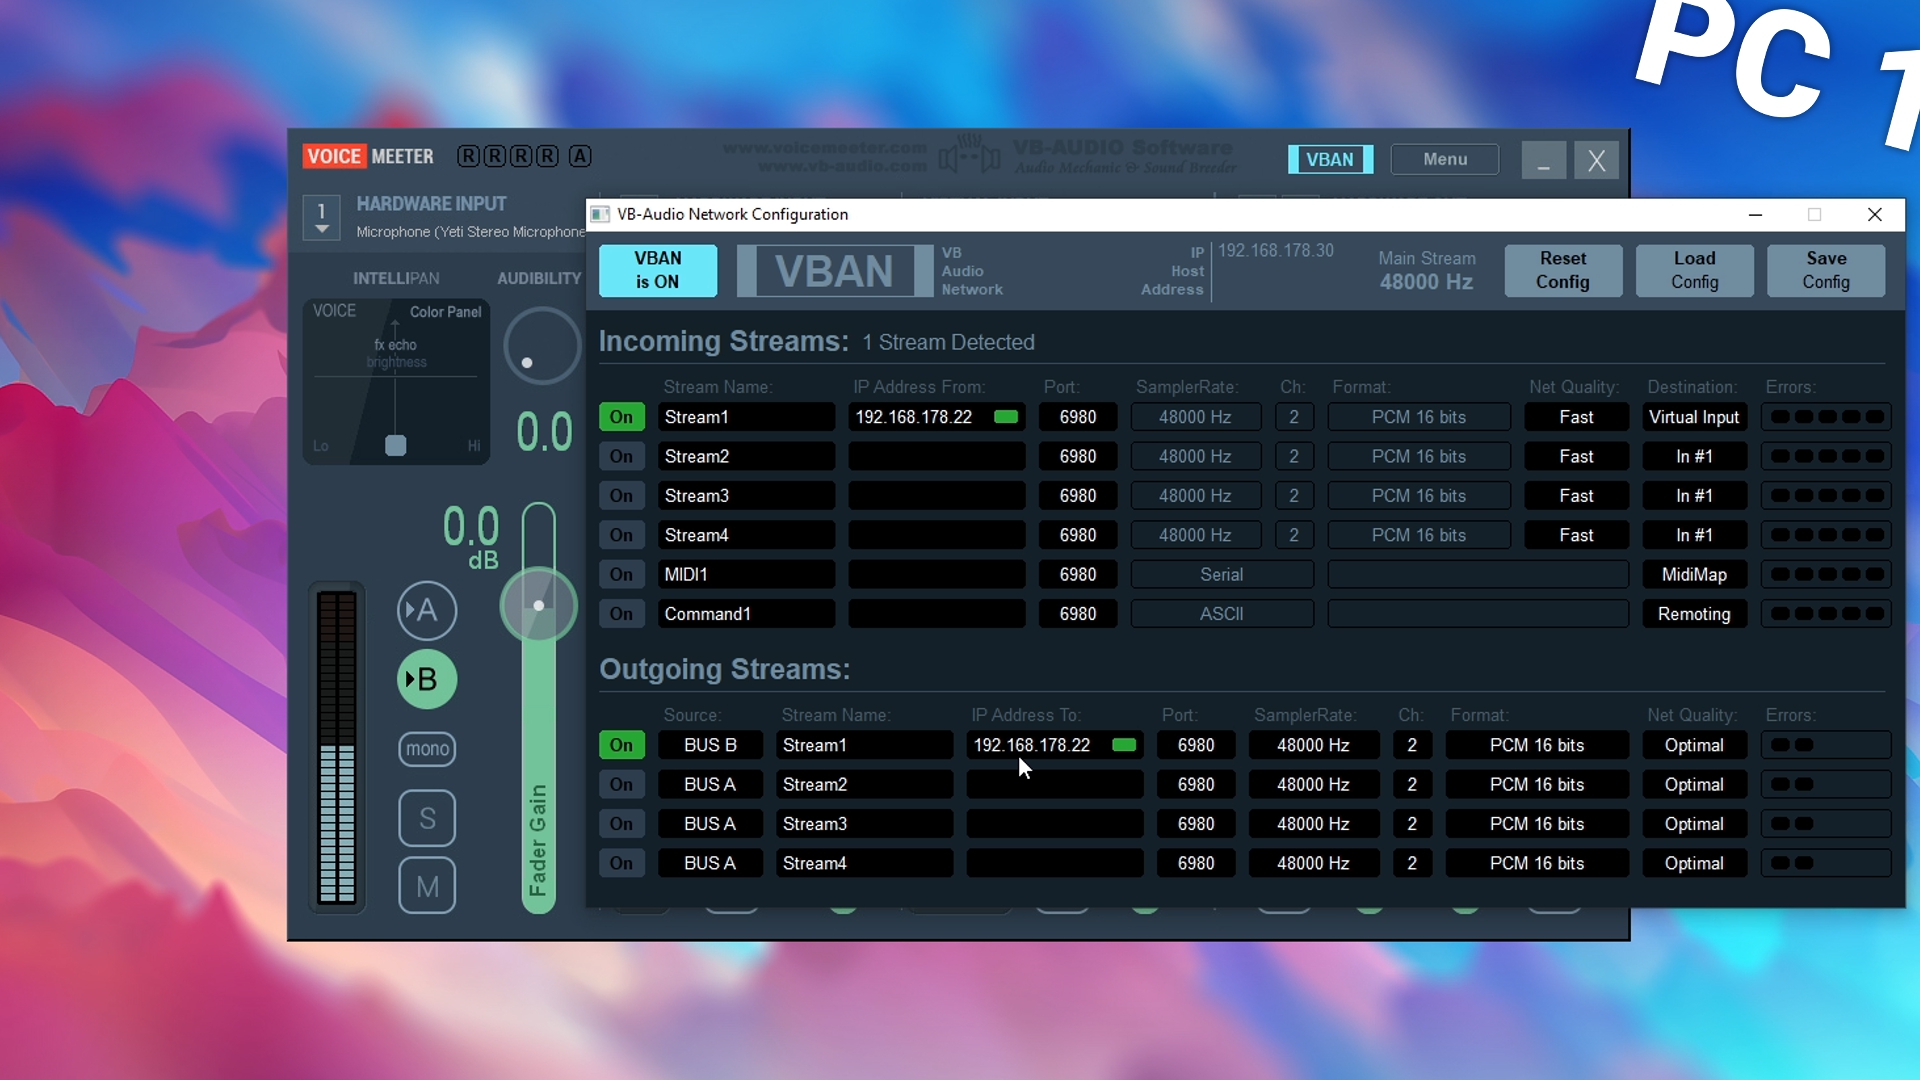
- Back on the gaming PC, click on VBAN button in VoiceMeeter and click on the VBAN is OFF button
- Under incoming streams enable the first stream and enter the local IP address of the streaming PC
- Make sure that destination is set to virtual input (see second screenshot)
- This should now enable you to hear any sounds played back on the streaming PC directly with the default playback device that you use on your gaming PC!

4. Set up a fixed IP address
You can set up a fixed IP address for both your gaming and streaming PC such that you never ever have to touch VoiceMeeter after being done with this tutorial!
- Click on Start Menu
- Type Control Panel
- Go to Network and Internet
- Click on View network status and tasks
- Click on Change adapter settings
- Right-click on your default internet adapter
- Click on Properties
- Click on IPv4
- Click on Properties
- Enable Use the following IP address
- Type your preferred IP address
- Click on Subnet mask to get it filled in automatically
- Enter the Default gateway which is simply the IP address of your router
- Note: If you don’t know the IP address of your router click on the start menu, open CMD, enter ipconfig /all and check what your default gateway currently is
- Enter the Preferred DNS server, so again the local IP address of your route
- You do not need to enter an Alternative DNS server

5. Send microphone from gaming to streaming PC
If you don’t want to set up your microphone on the streaming PC but want to set it up on the gaming PC instead, you need to make some further configuration to get this to work:
- Select your microphone under the first Hardware Input in VoiceMeeter on the gaming PC
- Select BUS B for the first Hardware Input and BUS A for the Virtual Input (which is the audio coming from the streaming PC)
- Click on VBAN to open the network configuration again
- Enable the first outgoing stream and select BUS B as source
- Next, enter the IP address of the streaming PC
- On the streaming PC, click on VBAN
- Enable the first incoming stream and enter the IP address of your gaming PC
- As destination, choose in #1
- Select BUS B for the first Hardware Input device
- Select BUS A for the Virtual Input


6. Set up Discord to receive microphone from gaming PC
Finally, you can set up Discord or Teamspeak running on your streaming PC to receive the microphone connected to your gaming PC and vice versa send the audio from Discord or Teamspeak to your headset connected to your gaming PC.
- Open Discord
- Go to User Settings
- Click on Voice & Video
- Select VoiceMeeter Output under Input Device and VoiceMeeter Input as Output Device!

And with that you should have successfully set up a dual PC audio setup!