
Table of Contents
In-depth guide on how to secure a Linux home server running Ubuntu 20.04. This post explains how to change the default SSH port, how to configure a UFW firewall, how to use ssh key-based authentication, how to install and configure fail2ban, and finally how to setup two factor authentication (2FA).
Prerequisites
- A running Ubuntu instance
- SSH access to your server
1. Change the default SSH port
To change the default SSH port, modify the sshd configuration file
Port 549In order to access your server from outside of your local network, you need to forward that port your machine in your router’s configuration.
Now you will always need to specify the port used for SSH’ing into your server, as otherwise SSH will attempt to use the (now no longer working) port 22
ssh -p 549 roman@192.168.1.10Don’t forget to port-forward this to your home server in your router’s configuration if you want to access your home server from outside of your local network!
Pro tip, I always recommend creating an “alias” for login purposes such that you won’t need to remember which SSH port you have used. This can easily be achieved by saving the connect command to your ~/.bashrc file
alias <random-name>="ssh -p <SSH-PORT> <USERNAME>@<LOCAL-IP>"where random-name is any name for your alias
SSH-PORT is the port that you set up above, e.g. 549
USERNAME is the username on the server that you want to SSH into, e.g. roman
LOCAL-IP the local IP address, e.g. 192.168.1.100
2. Install and setup ufw
UFW, or uncomplicated firewall, should generally already come pre-installed on Ubuntu 20.04. If for some reason it’s not already installed on your machine, you can get it using
sudo apt install ufwNext, set up some basic rules and enable the firewall. Before continuing, make sure that you have specified the correct port for SSH. Otherwise you will lock yourself out from your own server!
sudo ufw default deny incoming
sudo ufw default allow outgoing
sudo ufw allow 549/tcp comment 'SSH'
sudo ufw allow http
sudo ufw allow https
sudo ufw enable
This should provide you with some basic security, as only the ports specified can now be accessed. You can check which ports are allowed using
sudo ufw statusAn additional layer of security can be gained by additionally blocking ping requests. For this, update the following line
-A ufw-before-input -p icmp --icmp-type echo-request -j DROP
Note that doing this will prevent you from finding your server’s local IP address using an IP scanner so make sure you know your server’s IP address before implementing this safety measure!
Finally, reload the firewall using
sudo ufw reload3. Generate keygen
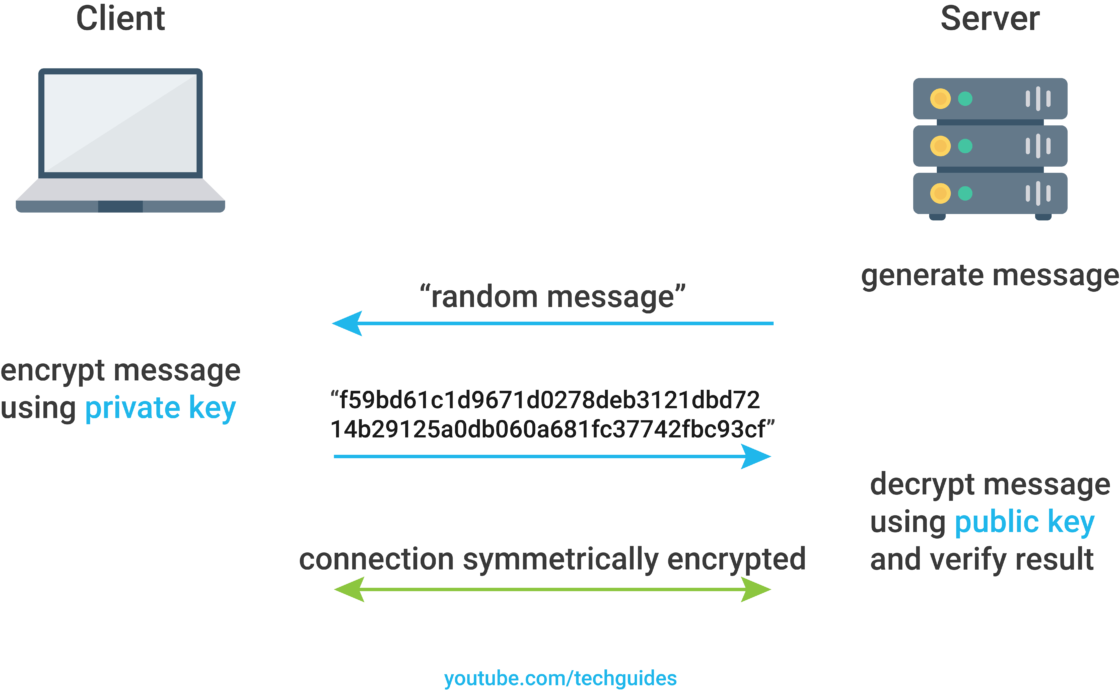
In order to make our SSH connection even more secure, I recommend to generate a key instead of a plain old password. Reason being is that it’s close to impossible to become a victim of a man-in-the-middle attack because no sensitive information is exchanged between you and your server upon login.
This works by creating a key which has two parts: a private key (stays on the client) and a public key (is transferred to the server). Once a client attempts to establish a connection to the server, it generates a random message, which the client encrpyts using the private key. This message is then send back to the server which decrypts it using the public key. The session is then accepted if the response matches what the server has sent. This is a clever way of avoiding having to send authentication related information in plain text (or encrypted) between the server and client, as the random message is different for each new connection.
You can generate a key on your client machine (which you use to connect to your server) with
ssh-keygen -t rsa -b 4096 -C "<CLIENT-NAME>"I personally prefer not to use a passphrase for my key’s since I like to use two factor authentication anyways (see step 6 below).
Next, copy the public key to your server (mind the capital P to specify the non-standard SSH port)
scp -P 549 ~/.ssh/id_rsa.pub <YOURNAME>@<SERVER-IP>:/home/<YOURNAME>/.ssh/authorized_keysNote: If you already have an authorized_keys file on your server, simply paste the content of id_rsa.pub in that file on a new line.
Now you should be able to log-in to your server without getting a password prompt, since the server authorizes you using the keygen.
4. Only allow login with keygen
To make your server only accept ssh key-based authentication, edit the sshd_config file
PasswordAuthentication no
PermitRootLogin no
Next, restart the SSH deamon
sudo service sshd restart5. Install and setup fail2ban
First, install fail2ban
sudo apt install fail2banNext, copy the default fail2ban configuration file (make sure to end the custom file with .local)
sudo cp /etc/fail2ban/fail2ban.conf /etc/fail2ban/fail2ban.localAdd an SSH jail to the end of the file
[sshd]
enabled = true
port = 549
filter = sshd
logpath = /var/log/auth.log
maxretry = 3
bantime = -1
This will ban any IP address that has more than 3 failed login attempts over the last 600 seconds indefinitely. You can change the ban type to a certain time period by changing bantime to any value in seconds.
Finally, restart the fail2ban service
sudo service fail2ban restartGet the current fail2ban status using
sudo fail2ban-client status sshdIf you have accidentally banned one of your computers, you can un-ban any IP address by typing
sudo fail2ban-client set sshd unbanip 192.168.1.1006. Setup two factor authentication
If you want to add yet another layer of security, you can set up two factor authentication for SSH based login to your server. In this example, we are going to use the google authenticator, however this procedure would work similarly with other authentication software such as Authy.
You can download the google authenticator for both Android and Iphone. This tool basically just produces a time based token based on a long sequence of numbers and letters.
Next, install google authenticator on your server:
sudo apt update
sudo apt upgrade
sudo apt install libpam-google-authenticator
You can now set up two factor authentication by entering ‘google-authenticator’
google-authenticator

Do you want authentication tokens to be time-based (y/n) y
If you proceed by typing ‘y’, a large QR code will be displayed in your terminal, together with your secret key as well as one-time emergency codes (the large QR code is not shown in the following example).
Warning: pasting the following URL into your browser exposes the OTP secret to Google:
  https://www.google.com/chart?chs=200x200&chld=M|0&cht=qr&chl=otpauth://totp/roman@pi%3Fsecret%3DF6SAAPIKNF43K3Q5D6IJZVD2XM%26issuer%3Dpi

Your new secret key is: F6SAAPIKNF43K3Q5D6IJZVD2XM
Your verification code is 118926
Your emergency scratch codes are:
  66796638
  72679896
  78089263
  31547624
  93769960
Write down your secret key and emergency codes and open the google authenticator application on your mobile phone. In the app, click on the plus in the bottom right corner and hit ‘scan QR-code’. Then scan the QR code from your terminal.
Next, allow the google authenticator to update the required file in your home directory:
Do you want me to update your "/home/roman/.google_authenticator" file? (y/n) y
Now come three questions regarding the hardness of your google authenticator installation. The first one pertains to only allowing the use of the same authentication token once. I would strongly recommend to enable this.
Do you want to disallow multiple uses of the same authentication
token? This restricts you to one login about every 30s, but it increases
your chances to notice or even prevent man-in-the-middle attacks (y/n) y
The next setting pertains to the use of 3 codes to 17 codes. I would strongly recommend to disable this.
By default, a new token is generated every 30 seconds by the mobile app.
In order to compensate for possible time-skew between the client and the server,
we allow an extra token before and after the current time. This allows for a
time skew of up to 30 seconds between authentication server and client. If you
experience problems with poor time synchronization, you can increase the window
from its default size of 3 permitted codes (one previous code, the current
code, the next code) to 17 permitted codes (the 8 previous codes, the current
code, and the 8 next codes). This will permit for a time skew of up to 4 minutes
between client and server.
Do you want to do so? (y/n) n
Finally, you can limit the number of allowed login attempts to 3 every 30 seconds. Make sure to never accidentally enter the wrong codes yourself though or you will lock yourself out from your own server! I generally enable this.
If the computer that you are logging into isn't hardened against brute-force
login attempts, you can enable rate-limiting for the authentication module.
By default, this limits attackers to no more than 3 login attempts every 30s.
Do you want to enable rate-limiting? (y/n) y
Update the PAM sshd configuration file
#@include common-authAnd all the way on the bottom add
@include common-password
auth required pam_google_authenticator.so
All changes to the sshd_config file
ChallengeResponseAuthentication yes

UsePAM yes
AuthenticationMethods publickey,password publickey,keyboard-interactive
Finally, restart the ssh daemon
sudo service sshd restart
Hey Roman,
I really enjoyed your tutorial. It’s very straight forward and easy to follow. The key concepts are also still relevant, even 3 years later.
Just a minor suggestion if you decide to update this version or post a new one at some point:
You may have a reason for not using this but, I’d recommend using ‘ssh-copy-id’ for copying RSA public keys to remote server/s over copying them manually w/ scp. I’ve been using it for years and it’s included by default on most distros (even current versions of MacOS). It’s super convenient and difficult to screw up.
Thanks for your comment! Yes I definitely should to do an upgrade on this tutorial. I once ran into some issues with ssh-copy-id but cant really remember what those were…
Awesome guide! I was looking at how to add TFA on my SSH login and this helped a lot!
hey hello
first, thank you for that !!
id did eveything, it worked until i added. google auth.i rebboted after fail2ban setup and i could connect with ssh -p ### ubuntu @192.168.1.#, it asked for my key. passphrase ( i added. one) and it connected.
but after in installed google auth, i rebooted, and con not connect anymore..
i have the below error after i enter my key passphrase :
Enter passphrase for key ‘/Users/###/.ssh/id_rsa’:
ubuntu@192.168.1.#: Permission denied (keyboard-interactive).
any idea anyone ??
I’m sure the op figured this out already given it’s been 2+ years but in case this helps anyone else:
Try appending the -v option to your SSH client command which tells the client to print debug logs to stdout:
ssh -v -p @
If needed, you can increase the verbosity/debug level with -vv (debug level 2) or -vvv (debug level 3).
The debug logs will contain every single action the client performs while attempting to initiate, authenticate and if it succeeds, connect to the SSH server. The output will nearly always tell you at which point in the connection process the connection is failing and why it’s failing. If the reason for the failure isn’t entirely obvious based on the error/s generated in the output, a google search on the specific error will often yield 100s of results that will quickly point you in the right direction.
great! do more guides! u are good at it
Hi Roman,
I have been watching your tutorials for a bit now. Great tutorial for a beginner like me. Kudos!!!
Just a bit of background, I have a very limited knowledge of the Linux based operating system.
I completed step one, to change the default ssh port. I am able to login to my localhost server (in this case raspberrypi). However, once I login and write any command as sudo I get this message and then the output of the command. For instance, after completing step one, I wanted to see the status of ufw on my raspberrypi, so I type in sudo status ufw, and I get the following text as output: “sudo: unable to resolve host raspberrypi.localhost: Name or service not known
Status: inactive”
Of course it states the status but I am a bit uncomfortable with the preceding text. I would really appreciate any help.
Its quite late, but are you sure ufw’s been installed first? It probably isn’t by default on pi’s.
This is a greate guide, thanks a lot! Though I thought setting up ufw and setting sshd to only allow public key authentication and setting fail2ban would be secure enough, the rest seems like an overkill. Am I missing something?
Thanks for the awesome guide with easy to read, clear instructions. I applied everything here except the 2FA (only because I don’t want it) and it all worked with no problems.