
Table of Contents
In this tutorial, I will show you how to manually install a free wildcard SSL certificate using Let’s Encrypts Certbot for Nextcloud (both snap and non-snap instance) and WordPress on your Ubuntu 18.04 server.
An SSL certificate encrypts all communication between the users of your website and your server, which assures the integrity of the information being sent from the user to the server and vice versa. Furthermore, Google Chrome will flag any website which is not serving a valid SSL certificate as not-secure. The installation of an SSL certificate is therefore beneficial for both security and to improve your Google ranking. While traditionally an SSL certificate is only valid for the exact domain it was issued for, a wildcard SSL certificate allows you to secure all subdomains (e.g. blog.yourdomain.com as well as yourdomain.com) belonging to the parent domain name. This is beneficial, as that way you only ever have to maintain one SSL certificate.
Prerequisites
- Web server with SSH access (preferably Ubuntu 18.04)
- Apache set up as reverse proxy (refer to reverse-proxy-tutorial)
- Nextcloud installed either through snap or standalone
- WordPress installed and running under /home/httpd/vhosts/oberlandwetter.ch/httpdocs/Techguides
1. Install certbot
sudo apt update
sudo apt upgrade
sudo apt install certbot python3-certbot-apache
2. Obtain a free wildcard SSL certificate
Generate a wildcard SSL certificate with certbot for your domain (e.g. “yourdomain.com”)
sudo certbot certonly --manual -d *.yourdomain.com -d yourdomain.com --agree-tos --no-bootstrap --manual-public-ip-logging-ok --preferred-challenges dns-01 --server https://acme-v02.api.letsencrypt.org/directoryThis will respond with
Saving debug log to /var/log/letsencrypt/letsencrypt.log
Plugins selected: Authenticator manual, Installer None
Obtaining a new certificate
Performing the following challenges:
dns-01 challenge for yourdomain.com
dns-01 challenge for yourdomain.com
- - - - - - - - - - - - - - - - - - - - - - - - - - - - - - - - - - - - - - - -
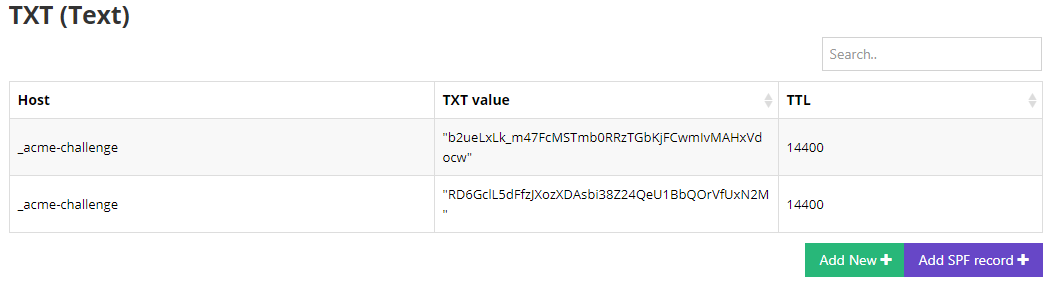
Please deploy a DNS TXT record under the name
_acme-challenge.yourdomain.com with the following value:
GtieeB0m32HvwVMalGd6eBkgt0HoaVb_hx3Cq3Mpz4k
Before continuing, verify the record is deployed.
- - - - - - - - - - - - - - - - - - - - - - - - - - - - - - - - - - - - - - - -
Press Enter to ContinuePress enter
- - - - - - - - - - - - - - - - - - - - - - - - - - - - - - - - - - - - - - - -
Please deploy a DNS TXT record under the name
_acme-challenge.yourdomain.com with the following value:

POtZIO-DW2CZufOV5mNiOsJDGlIBbtqnPaZ7iMricDM

Before continuing, verify the record is deployed.
(This must be set up in addition to the previous challenges; do not remove,
replace, or undo the previous challenge tasks yet. Note that you might be
asked to create multiple distinct TXT records with the same name. This is
permitted by DNS standards.)

- - - - - - - - - - - - - - - - - - - - - - - - - - - - - - - - - - - - - - - -
Press Enter to Continue
Only press enter after finishing step 3!
3. Set DNS TXT records
Next, log into your domain administration and add the challange values as DNS TXT records. As host, set _acme-challenge.
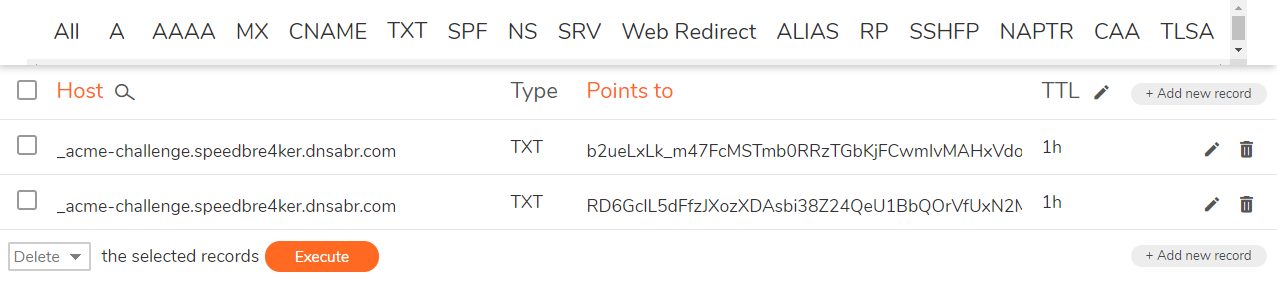
Now test if your changes have already propagated to the DNS servers by searching for _acme-challenge.yourdomain.com on https://dnslookup.online/txt.html
4. Apache SSL configuration
The default-ssl.conf file is used to specify the SSL certificate that should be used. Add the following block the this file between the <IfModule mod_ssl.c></IfModule mod_ssl.c> directives. Note that in the example, the directory /var/www/html/ will now be served when somebody browses to yourdomain.com.
<VirtualHost *:443>
        ServerName yourdomain.com
        SSLEngine On
        SSLCertificateFile /etc/letsencrypt/live/yourdomain.com/cert.pem
        SSLCertificateKeyFile /etc/letsencrypt/live/yourdomain.com/privkey.pem
        DocumentRoot /var/www/html/
        ErrorLog ${APACHE_LOG_DIR}/error.log
        CustomLog ${APACHE_LOG_DIR}/access.log combined
</VirtualHost>
Next, enable the default-ssl.conf configuration file as well as the SSL and rewrite module. Finally restart the apache service.
sudo a2ensite default-ssl.conf
sudo a2enmod ssl
sudo a2enmod rewrite
sudo service apache2 restart
5a) Nextcloud Apache configuration
If you are running a regular nextcloud server instance and want to make it available under a subdomain, e.g. cloud.mydomain.com, you can simply add another virtual host entry to the default-ssl configuration file.
<VirtualHost *:443>
        ServerName cloud.yourdomain.com
        SSLEngine On
        SSLCertificateFile /etc/letsencrypt/live/yourdomain.com/cert.pem
        SSLCertificateKeyFile /etc/letsencrypt/live/yourdomain.com/privkey.pem
        DocumentRoot /var/www/html/nextcloud
        <Directory /var/www/html/nextcloud/>
                Options +FollowSymlinks
                AllowOverride All
                <IfModule mod_dav.c>
                        Dav off
                </IfModule>
                SetEnv HOME /var/www/html/nextcloud
                SetEnv HTTP_HOME /var/www/html/nextcloud

                RewriteEngine On
                RewriteRule ^/\.well-known/carddav https://%{SERVER_NAME}/remote.php/dav/ [R=301,L]
                RewriteRule ^/\.well-known/caldav https://%{SERVER_NAME}/remote.php/dav/ [R=301,L]
                RewriteRule ^/\.well-known/host-meta https://%{SERVER_NAME}/public.php?service=host-meta [QSA,L]
                RewriteRule ^/\.well-known/host-meta\.json https://%{SERVER_NAME}/public.php?service=host-meta-json [QSA,L]
                RewriteRule ^/\.well-known/webfinger https://%{SERVER_NAME}/public.php?service=webfinger [QSA,L]

        </Directory>

        <IfModule mod_headers.c>
                Header always set Strict-Transport-Security "max-age=15552000; includeSubDomains"
        </IfModule>

        ErrorLog ${APACHE_LOG_DIR}/error.log
        CustomLog ${APACHE_LOG_DIR}/access.log combined

</VirtualHost>
Make sure that the path specified as DocumentRoot actually points to your nextcloud installation directory.
5b) Nextcloud snap reverse proxy configuration
If you are running nextcloud as a snap instance and you want to run nextcloud as a subdomain, then you first need to change the default ports to e.g. 81 for http and 444 for https.
sudo snap set nextcloud ports.http=81 ports.https=444Next, copy your certificates to the nextcloud snap directory (such that the snap can read them).
sudo cp /etc/letsencrypt/live/yourdomain.com/cert.pem /var/snap/nextcloud/current/cert.pem
sudo cp /etc/letsencrypt/live/yourdomain.com/chain.pem /var/snap/nextcloud/current/chain.pem
sudo cp /etc/letsencrypt/live/yourdomain.com/privkey.pem /var/snap/nextcloud/current/key.pem
Make sure to rename the privkey.pem to key.pem
Now change directories to the current nextcloud directory and install the custom SSL certificate.
cd /var/snap/nextcloud/current/
sudo nextcloud.enable-https custom -s cert.pem key.pem chain.pem
Next, set up a virtual host for your nextcloud snap instance.
<VirtualHost *:443>
        ServerName cloud.yourdomain.com

        SSLEngine On
        SSLProxyEngine on
        SSLProxyVerify none
        SSLProxyCheckPeerCN off
        SSLProxyCheckPeerName off
        ProxyPreserveHost On
        ProxyRequests Off
        SSLCertificateFile /etc/letsencrypt/live/yourdomain.com/cert.pem
        SSLCertificateKeyFile /etc/letsencrypt/live/yourdomain.com/privkey.pem

        RewriteEngine On
        RewriteRule ^/\.well-known/carddav https://%{SERVER_NAME}/remote.php/dav/ [R=301,L]
        RewriteRule ^/\.well-known/caldav https://%{SERVER_NAME}/remote.php/dav/ [R=301,L]
        RewriteRule ^/\.well-known/host-meta https://%{SERVER_NAME}/public.php?service=host-meta [QSA,L]
        RewriteRule ^/\.well-known/host-meta\.json https://%{SERVER_NAME}/public.php?service=host-meta-json [QSA,L]
        RewriteRule ^/\.well-known/webfinger https://%{SERVER_NAME}/public.php?service=webfinger [QSA,L]

        ProxyPass / https://192.168.1.1:444/
        ProxyPassReverse / https://192.168.1.1:444/

        RequestHeader set X-Forwarded-Port "443"
        RequestHeader set X-Forwarded-Proto "https"

</VirtualHost>
Finally, add your local IP address as ‘trusted_proxies’ and make sure that the ‘overwrite.cli.url’ is set to your encrypted subdomain in the nextcloud snap configuration.
<?php
$CONFIG = array (
...
  'overwrite.cli.url' => 'https://cloud.yourdomain.com',
  'trusted_proxies' =>
  array (
    0 => '192.168.1.1',
  ),
);
6. WordPress Apache configuration
Assuming that you are running a wordpress blog under “blog.mydomain.com”, this would be the required Apache configuration.
<VirtualHost *:443>
        ServerName blog.yourdomain.com
        DocumentRoot /home/httpd/vhosts/oberlandwetter.ch/httpdocs/Techguides
        SSLEngine On
        SSLCertificateFile /etc/letsencrypt/live/yourdomain.com/cert.pem
        SSLCertificateKeyFile /etc/letsencrypt/live/yourdomain.com/privkey.pem

        <Directory /home/httpd/vhosts/oberlandwetter.ch/httpdocs/Techguides/>
                AllowOverride All
                Require all granted
                RewriteEngine On
        </Directory>
        ErrorLog ${APACHE_LOG_DIR}/error.log
        CustomLog ${APACHE_LOG_DIR}/access.log combined
</VirtualHost>
7. Force secure connections
If you want to ensure that only secure connections are established to your server, you can specify a rewrite rule in the default Apache configuration file.
<VirtualHost *:80>
        RewriteEngine On
        RewriteCond %{HTTPS} off
        RewriteRule ^ https://%{HTTP_HOST}%{REQUEST_URI}
</VirtualHost>
Hello Roman,
I couldnt find in your post about Godaddy’s wildcard certs. Could you plese post that procedure?
Hello Roman,
I couldn’t find the instruction for Godaddy’s wildcard certs, only LetEncrypt’s. The files provided by Godaddy don’t match Godaddy’s web help instructions. There is no info regarding the Key file and KeyChain.
Thank you in advance.
Thank you for your work, Roman. I have followed your guides and successfully setup Bitwarden and assigned an SSL via Cerbot.
Can you please advise or directed me to the correct steps to follow regarding SSL renewal via Certbot?
If there is a way to setup auto renewal and apply it to the method we have used, that would be ideal!
Hello,
when running the second step’s command: “sudo certbot certonly –manual -d *.yourdomain.com -d yourdomain.com –agree-tos –no-bootstrap –manual-public-ip-logging-ok –preferred-challenges dns-01 –server https://acme-v02.api.letsencrypt.org/directory” (with my own domain name), it returns (among other things, the process is not interrupted anyway) this error message:
“Use of –manual-public-ip-logging-ok is deprecated.”
Do you think it may be problematic? Do you have an idea about what would be a more appropriate option definition for certbot? No hints are given with the error message…
(But ok, I guess I should go through certbot man… but maybe if you have a solution you can then adapt your tutorial… I’ll tell you if I find something…)
Thanks for any help!
From what I found on github, it seems that this flag now requires an argument. I think its OK to just remove that flag.
Hello I am currently trying to get Bitwarden to work behind the wildcard SSL Certification. However I am getting a 500 internal server error. I was able to successfully get nextcloud working behind it with your instructions above. Not sure what I am doing wrong.
ServerName bitwarden.MYDOMAIN.com
SSLEngine On
SSLProxyEngine On
SSLProxyVerify none
ProxyVia On
ProxyRequests Off
ProxyPass / http://MYINTERNALIP:8080/
ProxyPassReverse / http://MYINTERNALIP:8080/
ProxyPreserveHost on
SSLProxyCheckPeerCN Off
SSLProxyCheckPeerName Off
Options FollowSymLinks MultiViews
AllowOverride All
Order allow,deny
allow from all
SSLCertificateFile /etc/letsencrypt/live/MYDOMAIN.com/cert.pem
SSLCertificateKeyFile /etc/letsencrypt/live/MYDOMAIN.com/privkey.pem
SSLCertificateChainFile /etc/letsencrypt/live/MYDOMAIN.com/chain.pem
ErrorLog /var/log/apache2/error.log
CustomLog /var/log/apache2/access.log example
Quick Question. I am trying to get bitwarden to work behind the wildcard cert but for some reason apache gives a internal server error 500. Anyway you could help me figure out what I am doing wrong?
I should mention that I was able to successfully get nextcloud working behind the Wildcart cert via your instructions on this page. So It has to be something with the virtualhost configuration for bitwarden?
ServerName bitwarden.MYDOMAIN.com
SSLEngine On
SSLProxyEngine On
SSLProxyVerify none
ProxyVia On
ProxyRequests Off
ProxyPass / http://MYINTERNALIP:8080/
ProxyPassReverse / http://MYINTERNALIP:8080/
ProxyPreserveHost on
SSLProxyCheckPeerCN Off
SSLProxyCheckPeerName Off
Options FollowSymLinks MultiViews
AllowOverride All
Order allow,deny
allow from all
SSLCertificateFile /etc/letsencrypt/live/MYDOMAIN.com/cert.pem
SSLCertificateKeyFile /etc/letsencrypt/live/MYDOMAIN.com/privkey.pem
SSLCertificateChainFile /etc/letsencrypt/live/MYDOMAIN.com/chain.pem
ErrorLog /var/log/apache2/error.log
CustomLog /var/log/apache2/access.log example
Note: to install certbot nowadays, you need to type sudo apt-get install python3-certbot-apache
Thanks! I’ve just updated the install part
Hello,
I got the server running (I had missing modules which posed problem in the previous tutorial on setting up reverse proxy), but I’m still struggling with the nextcloud snap config (already in the previous tutorial I think). To be sure, do you systematically happen the text at the end of the config.php file? I’m unsure for in point 5b for instance, the line “‘overwrite.cli.url’ => ‘https://cloud.yourdomain.com’,” already exists in the conf file and also the array for ‘trusted_proxies’. But I tried only to change the values in the existing lines and it doesn’t work either… Should I errase ‘localhost’ and ‘yourdomain.com’ in the ‘trusted_proxies’ and put ‘192.168.1.1’ instead? I will continue to try… thanks for your help
found the mistake! In my case, in default-ssl.conf, the proxypass and reverse proxypass had to be set on localhost:444 and not 192.168.1.1 for this is not the IP of my localhost!
well worked for a while and stopped working again… should I also adapt the trusted proxies to ‘localhost’? I tried but to no avail…
Ill have a look when I get some free time. Pretty busy today
thanks though! I think there maybe an issue in your script regarding the proxy IP… have a nice day!
ok, so now it works 🙂 in config.php, I set the IP of the localhost in trusted_proxies, overwrite host to cloud.mydomain, and it worked… sorry for spaming. Hopefully it helps someone!
Awesome, glad to see you’ve figured it out!
Hi,
Great tutorial, very helpful.
I’m running Nextcloud, Homeassistant and Plex on the same server.
I’m using subdomains, how do I go about writing the default.conf and the defaul-ssl.conf so that everything that is coming on port 80 get redirected to their proper port and application.
Can I just put all the rules in one file default.conf oand default-ssl.conf ?
Thank you.
I had to use the:
“Re-direct permanent /secure https://yoursite.com/secure”
in my Default config file
Example:
=======
ServerName www.yourdomain.com
DocumentRoot /*WHEREVER YOUR SITE IS LOCATED*
Redirect permanent /secure https://yourdomain.com/secure
Bonjour,
C’est un bon travail , grâce à vous j’ai résolu mon problème de renouvellement de certificat avec let’s encrypt qui ne fonctionnait pas.
Voici la commande que j’utilisais :
sudo certbot certonly –dns-cloudflare –dns-cloudflare-credentials /root/.secrets/cloudflare.cfg -d montech.tk,*.montech.tk –preferred-challenges dns-01
avec l’option –manual cela a fonctionné du premier coup.
but you dont speak of renewing the certificate, i guess cron job won’t do ! “cerbot renew ” have to be forgotten …
Hi! Thank you for your comment. Here it is in English:
Good job, thanks to you I solved my problem of certificate renewal with let’s encrypt which did not work. Here is the command I used:
sudo certbot certonly –dns-cloudflare –dns-cloudflare-credentials /root/.secrets/cloudflare.cfg -d montech.tk, *. montech.tk –preferred-challenges dns-01
with the –manual option it worked the first time!